
The most commonly used screen in e-Courier for day-to-day operations is Orders & Dispatch > Order Entry CSHTML. This is where users can create new orders and access information about orders that have already been placed.
Watch the video below to learn how to create an order and extra tips to keep your business moving.
Typical Order Workflow
A typical order / job will go through the following stages.
Entry Tab
To enter an order, go to CMS > Orders & Dispatch > Order Entry CSHTML. Users can also go to CMS > Orders & Dispatch > Order Entry (Legacy) to use the old (Legacy) Order Entry screens.
The screenshots for entering an order will be from Order Entry CSHTML (new Order Entry). Old Order Entry contains the same tabs, frames, and fields; the only difference is that Order Entry CSHTML can be used in any browser and has a different appearance. For more information on the old versus CSHTML screen, see how to navigate around e-Courier.
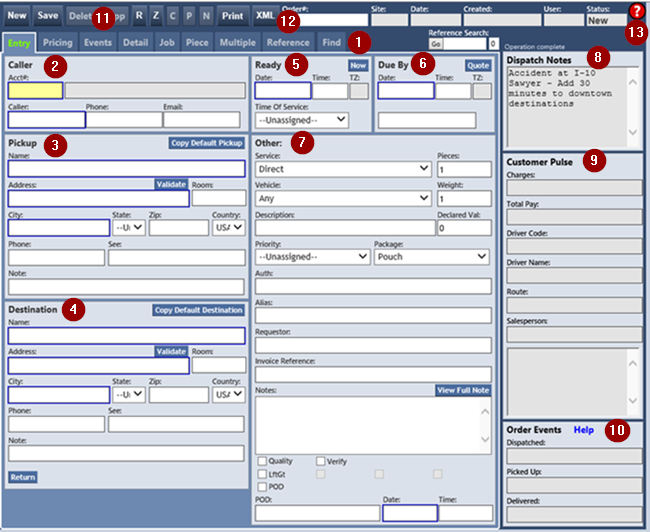
The first tab when entering an order is the Entry tab. The new order screen will look like the following:
-
Tabs - grouped sections to enter different information about the order. The Entry tab on the far left is the first displayed and has the vital summary information about the order
-
Caller frame - which account and individual requested the order
-
Pickup frame - where the pieces of an order need to be picked up
-
Destination frame - where the pieces of an order will be delivered
-
Ready frame - the date and time that the order will be ready to deliver
-
Due By frame - the date and time of anticipated delivery
-
Other frame - service, vehicle, priority, POD, and other information
-
Dispatch Notes - notes from dispatcher(s) that are relevant to the order. This frame is visible from every tab and populated automatically as the information is entered in DMS (see DMS everyday usage article for more information).
-
Customer Pulse frame - payment details for drivers, agents, and salespersons. This frame is visible from every tab and populated automatically
-
Order Events frame - fields will populate automatically as an order is dispatched, picked up, and delivered. This frame is visible from every tab
-
Action buttons - buttons to serve different functions on the order. Some buttons are not usable until a new order has been saved; these will be grayed out, like the buttons C, P, and N. These buttons are visible from every tab
-
Order summary - high level summary information about the order and status. These fields are visible in every tab
-
Red question mark - hover mouse over this icon for additional notes. The red question mark appears on most CSHTML screens in e-Courier for a tool tip and, in some cases, can be clicked to open a new window with additional documentation. The old Order Entry screens lack this feature.
Caller Frame
-
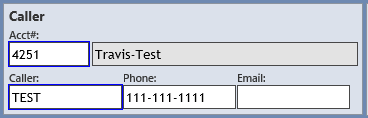
Acct# - enter the account number or first few characters of the account name and press Enter or Tab. An exact account number match will automatically populate that account information. If a user enters the first few characters of an account name, pressing Tab will open a pop-up window with possible choices. User can click on the desired account code and the fields will populate.
-
Caller, Phone, and Email - User can enter a full caller name and contact information, or can enter the first few characters of the caller's name and press Enter to see choices (user can then tab to or click the desired caller from the list).
-
If entering a new caller, users MUST put at least a name and phone number in order for the caller information to save. That caller will then be saved and displayed in the table for future orders
-
Customer notes associated with the selected caller will appear in the last box in the Customer Pulse frame
-
Pickup Frame
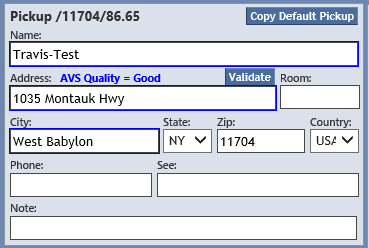
The title of the frame contains the pickup Zip code and the miles to the destination (will only appear after saving the order). If an order will have multiple jobs, fill in the first pickup address.
-
Copy Default Pickup button - copy the customer's default pickup information into the appropriate fields
-
Name - if entering someone new, put the individual's or company's name in this field. However, there are a couple shortcuts:
-
If pickup is the same as billing customer - use CTRL-C to populate name and address of billing customer
-
If shipped to this customer before - type a few characters of the company or individual's name and press Enter to look up against stored addresses. Put "!" in front of the search criteria to perform a global search
-
-
Address - enter street address, if it was not completed in the previous step. Click the Validate button to check against Google or MapPoint (depending on configuration)
-
City - if not completed from previous step, user can fully type in the city name or enter a Zip code in this field and press Enter to automatically populate the City, State, Zip, and Country fields with the correct information
-
State/Zip/Country - enter appropriate info into these fields, if not completed from the previous steps
-
Phone - enter phone number associated with the pickup stop
-
See - enter person or department to see associated with the pickup stop
-
Room - enter room or suite number associated with the pickup stop
-
Note - enter pickup stop-specific notes (see main order notes in the Other frame for more information)
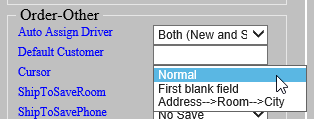
When a user tabs out of the Note field, the cursor will move to the Destination frame > Name field. To change cursor flow, go to CMS > Utility > Site > Order tab > Order-Other frame > Cursor combobox. Set as desired, save, and refresh order entry (or log out and back in).
Destination Frame
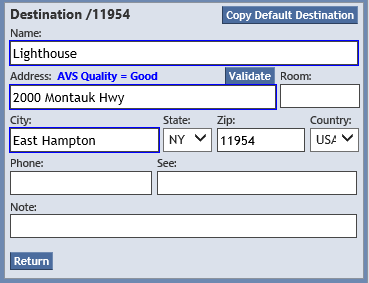
The following notes and shortcuts are the same as the Pickup frame. The title of the frame contains the destination Zip code (will only appear after saving the order). If an order will have multiple jobs, fill in the final destination address.
-
Copy Default Destination button - copy the customer's default destination into the appropriate fields
-
Name - if entering someone new, put the individual's or company's name in this field. However, there are a couple shortcuts:
-
If destination is the same as billing customer - use CTRL-C to populate name and address of billing customer
-
If shipped to this customer before - type a few characters of the company or individual's name and press Enter to look up against stored addresses. Put "!" in front of the search criteria to perform a global search
-
-
Address - enter street address, if it was not completed in the previous step. Click the Validate button to check against Google or MapPoint (depending on configuration)
-
City - if not completed from previous step, user can fully type in the city name or enter a Zip code in this field and press Enter to automatically populate the City, State, Zip, and Country fields with the correct information
-
State/Zip/Country - enter appropriate info into these fields, if not completed from the previous steps
-
Phone - enter phone number associated with the destination stop
-
See - enter person or department to see associated with the destination stop
-
Room - enter room or suite number associated with the destination stop
-
Note - enter destination stop-specific notes (see main order notes in the Other frame for more information)
-
Return button - creates a multi-stop round-trip order.
When a user tabs out of the Note field, the cursor will move to the Destination frame > Name field. To change cursor flow, go to CMS > Utility > Site > Order tab > Order-Other frame > Cursor combobox. Set as desired, save, and refresh order entry (or log out and back in).
Ready Frame
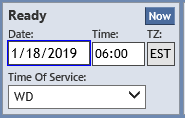
Enter the date, time, and time of service for when the order will be ready. Click the Now button at the top right to fill in the current time.
Due By Frame
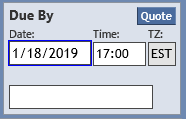
Enter the date and time when the order will be due. To see the available service options, click the Quote button at the top right for a list of applicable services as well as their corresponding due dates and prices.
Other Frame
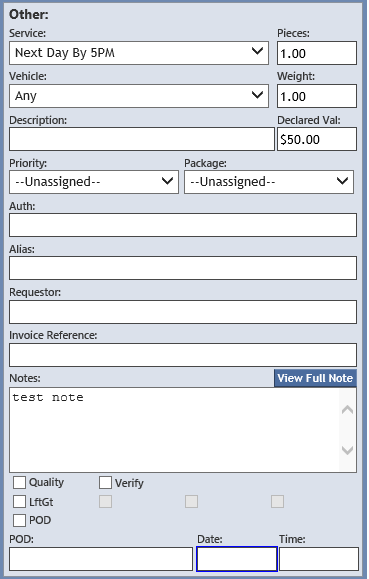
When entering these fields, verify that everything is correct with the customer before saving a new order. Fields can be edited later if necessary, but ensuring that everything is correct before saving will help save time and prevent frustration for dispatchers and customers later.
If unsure of what a given field is configured to do, consult a supervisor or submit a ticket to e-Courier's help center.
-
Service - select the desired service. In this and all other comboboxes, user may either press the down arrow in the box to see all choices or can click in box and type first few characters to jump to selection
-
Pieces - enter number of pieces associated with order
-
Vehicle - select desired vehicle type
-
Weight - enter proper weight associated with order
-
Description - enter a description associated with order
-
Declared Val - check with a supervisor for appropriate use, if applicable
-
Priority - can set the priority of a single order here. To set a default priority by customer, see article on how to create and edit a customer.
-
Package - select the type of package (envelope, pouch, box, etc)
-
Auth - authorization / reference number, if used. Check with a supervisor for appropriate use. This field can be renamed in Customers > Client Information > Reference tab > Reference frame. A prompt can also be displayed in red above the field. See eSheet 51 for more information.
-
Alias - for internal use or as an extra authorization field, if applicable. Check with a supervisor for appropriate use
-
Requestor - name of the person who requested the order
-
Invoice Reference - check with a supervisor for appropriate use, if applicable
-
Notes - main order notes. We recommend that a user only use this field when necessary and do not re-enter information that can be seen in other fields
-
Quality - if checked, will change the background of the Pieces Weight cell in DMS > Unassigned Jobs screen to yellow. Used when delivery time is later than the promised time
-
Verify - if checked, will invoke Verify Rules when cleared from dispatch, the POD is entered, or the last stop is cleared. In most cases, this should be left as initially set. Check with a supervisor for appropriate use
-
LftGt (and three blank checkboxes to right) - miscellaneous rating boxes set up for use. Check with a supervisor for appropriate use
-
POD checkbox - if checked, will force a POD when clearing from dispatch or before allowing the order to be manually approved. In most cases, this should be left as initially set
-
POD - when order is completed, will automatically populate with name of POD
-
Date - when order is completed, will automatically populate with date of POD
-
Time - when order is completed, will automatically populate with time of POD
Action Buttons

The action buttons at the top are available in all tabs.
-
New - blanks out all fields to start a new order
-
Save - saves an order, whether a brand new order or when editing an existing order. An order can be saved once all the required fields in the Entry tab are filled in and have been verified with the caller. After saving order, alert the customer to the order number for their reference
-
Delete - deletes order OR reactivates a deleted order. When this button is clicked, system will display a prompt to make sure deletion / reactivation is desired. Prompt can be turned off
-
App - manually approve order to move to invoicing. For more information on auto-approving, see [eSheet 49]
-
R - creates a repeat order. Once an order is saved, click the R button to start a new order with the same values in the Entry tab EXCEPT for the Destination frame
-
Z - creates a second order with round-trip logic and displays notes in both to cross-reference order. This is different from using the Return button in the Entry tab > Destination frame, which puts round-trip logic on the same order [link to round-trip order article]
-
C - creates a duplicate of the saved order
-
P - previous order in list (when user found order in Find tab)
-
N - next order in list (when user found order in Find tab)
-
Print - will display label options for printing
-
XML - will display XML code for order. Used for reference when creating stylesheets.
Order Summary

The top order summary, visible in all tabs, contains the vital information of the order number, site, date ready/delivered, created date, customer (user), and status. These fields will remain blank until the order has been saved. In Order Entry CSHTML, entering an existing order number in the Order# field and clicking Go will pull up the order (this functionality is not available in old order entry. For more information, see [article on searching in e-Courier]
Additionally, the Order# and User fields can have background colors to give more information.
Order# background colors
-
No color (above screenshot) - normal order
-
Yellow - template order. This is not a completed order on its own, but a template for creating other orders
-
Red - order has been deleted
-
Orange - template has been deleted
User background colors
-
No color - either a CMS user or system created the order
-
Red (above screenshot) - web remote user submitted the order
Dispatch Notes
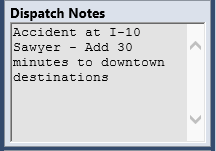
Dispatch Notes field contains any notes a dispatcher entered from DMS. These notes cannot be changed from CMS.
Customer Pulse
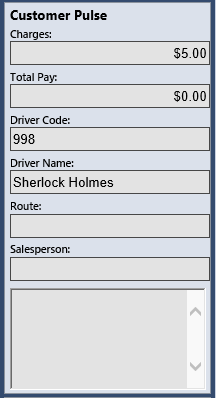
Customer Pulse frame automatically populates with the additional charges, total pay to the driver, driver code, driver name, route (if applicable), salesperson (if applicable), and any additional customer notes.
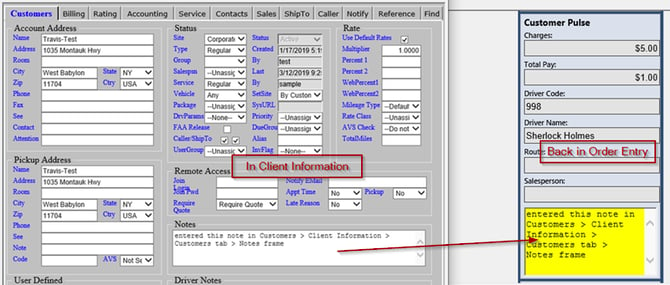
If there are customer notes (set in Customers > Client Information > Customers tab > Notes frame), the notes field will be highlighted in yellow.
Order Events
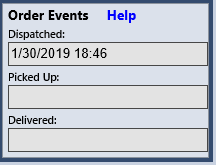
Order Events frame automatically populates with timestamps of when the order was dispatched, picked up, and delivered (based on the time zone configuration).
The Picked Up date/time will have a red background if job 1, stop 1 is complete without completing all the pieces at that stop.
The Delivered date/time will have a red background if the last job's last stop is complete without completing all the pieces at that stop.
Pricing Tab
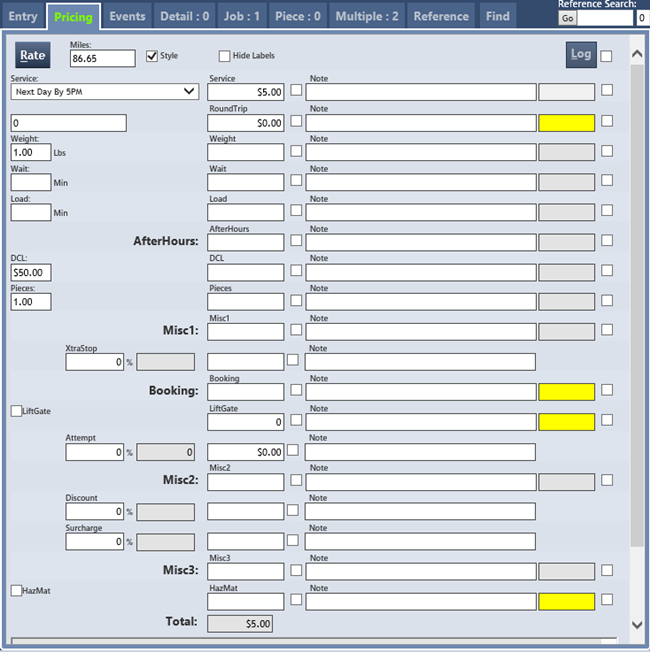
After saving an order, the Pricing tab will populate based on the configured rating structure, if applicable. Click the Rate button at the top left to refresh the rate. Any field that isn't grayed out can be overwritten if necessary.
The Pricing tab title may appear in different background colors, depending on the situation:
-
No color (as in above screenshot) - Order does not rate AND there are no overrides
-
Green - Order successfully rates AND there are no overrides
-
Yellow - Order successfully rates AND one or more fees are overridden AND each overridden fee has a value
-
Red - Order successfully rates AND one or more fees are overridden AND at least one overridden fee lacks a value
Events Tab
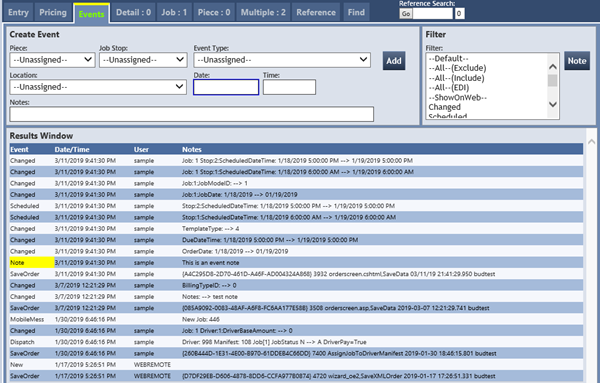
The Events tab will list out the log of all field changes, notifications, messages, and EDI events that have occurred with a given order.
To add a new event, set each combobox and field in the Create Event frame as desired, then click Add.
To create an internal event note (does not show on web remote or mobile data), click the Note button in the Filter frame and enter the desired note in the new window. Close the window and save the order.
The background color of the tab at top and of the events listed in the Results Window give information on the type of events:
Events tab background colors
-
Yellow (as in above screenshot) - internal event notes are present
-
Magenta - events configured to be shown on web remote are present
Event column in Results Window background colors
-
Green - EDI event
-
Yellow (as in above screenshot) - internal event note
-
Magenta - event set to show in web remote
Detail Tab
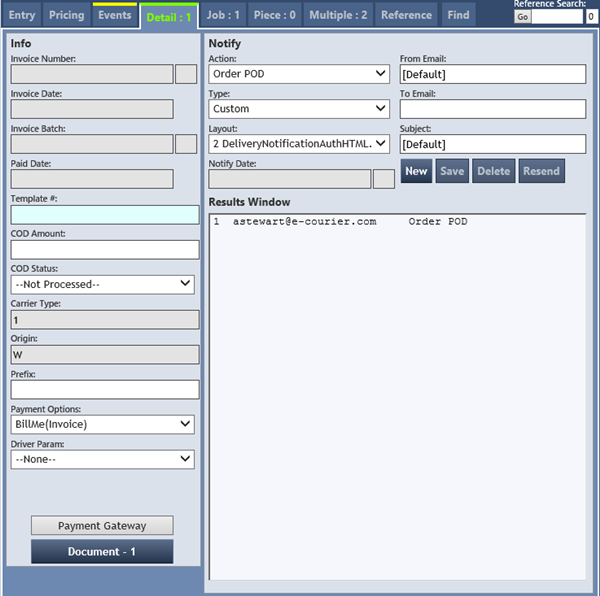
The Detail tab contains specific invoicing information, a list of notifications (if any), and stores documents related to the order. The title of the tab will take the format of "Detail : [number of attached documents]" and will be highlighted in green if one or more notify rows have been set up to send email notifications (as in above screenshot).
Clicking the Payment Gateway button will display any credit card activity, if using credit card logic.
Clicking the Documents button will allow the user to upload or view documents attached to that order. The number of documents attached to an order will appear in the label of the Document button (in the case of the above screenshot, 1 attached document). Once the order has been saved, the number of attached documents will also appear in the Detail tab label.
To send a new email notification, click the New button in the Notify frame, set comboboxes and fields as desired, then click Save. Notifications will be listed in the Results Window.
Job Tab
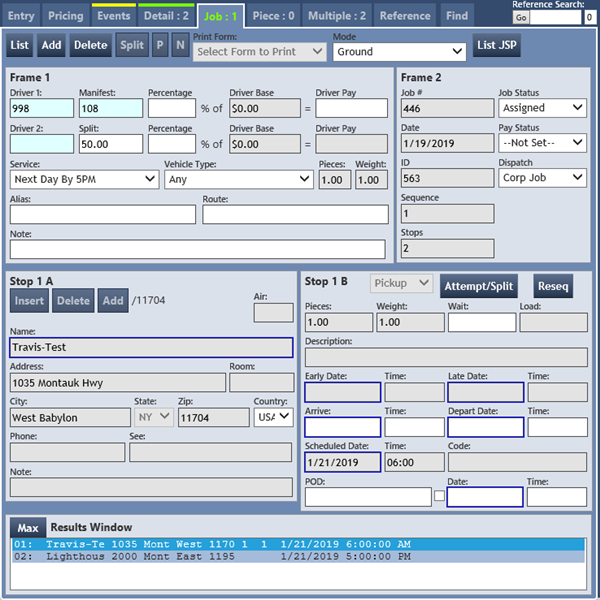
The title of the tab is in the format "Job : [number of jobs in order]." If there is more than one job, the tab will also be highlighted in green.
Frame 1
Frame 1 contains specific information about a driver's pay, the service and vehicle type for the job(s), and any extra route information. Right-clicking in the fields with a blue background (Driver 1, Manifest, and Driver 2) will open a new window to locate the driver and manifest desired.
A driver's pay can be calculated in two different ways.
-
Percentage - input a percentage value to calculate a driver's pay from a base amount. Right-click in the field to lock the value (will turn yellow) or unlock the value (will revert to no color).
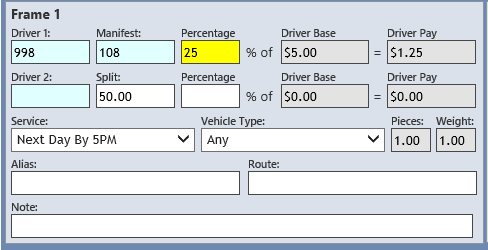
-
Custom commission - input the value "999" into the percentage field, then input the custom commission value into the Driver Pay field. Right-click in the Driver Base field to lock the value (will turn red) or unlock the value (will revert to gray).
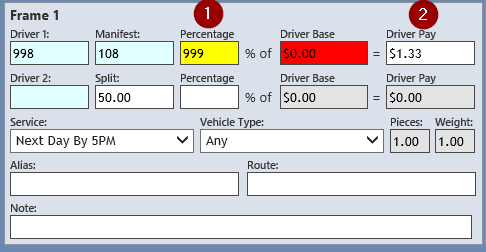
If desired, a user can also split a job with a second driver by entering their driver number, the percentage split value, and the percentage of the second driver's base pay. To learn how to split a job with more than two drivers, see eSheet 23.
Frame 2
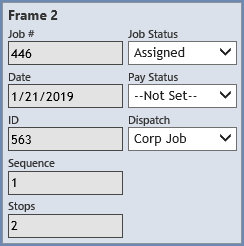
The grayed-out fields on the left side of frame 2 are automatically populated with job information after an order is saved. Set the Job Status and Pay Status as needed (see definitions at the top of this page).
The Dispatch combobox will set automatically based on configurations, but can be changed if needed. Changing the Dispatch group manually will change the background color of the field to red.
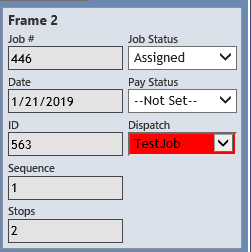
Top Buttons

The buttons at the top of the tab allow a user to manage the jobs associated with an order.
-
List - if more than one job, will open a new window listing all jobs associated with the order
-
Add - add a new job
-
Delete - delete the selected job
-
Split - creates a second job in the order, automatically entering the order's destination into the new job's Stop 2 and highlighting the new job's Stop 1. See eSheet 23 for more information on how to split jobs.
-
P - if more than one job, will go to the previous job in list
-
N - if more than one job, will go to the next job in list
-
Print Form - select a form to display
-
Mode - select the transportation mode for the job
-
List JSP - will open a new window with a list of pieces in the job stops, when they arrived, when they were entered (scanned), and user who entered them
Stops
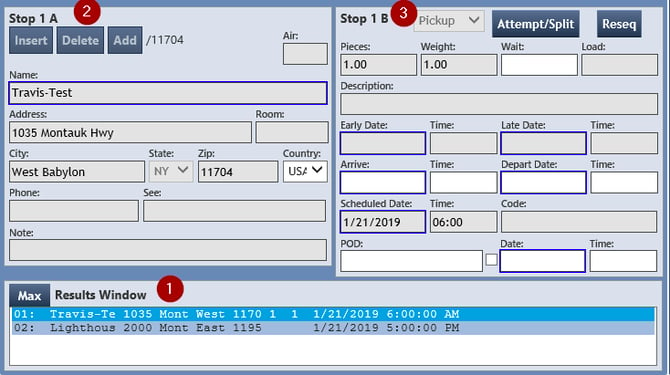
-
Results Window - lists out all job stops associated with the job. Select a row to populate the upper frames with stop information
-
Stop [#] A - displays the address and contact information for the selected stop
-
Insert button - inserts a new stop BEFORE the selected stop
-
Delete button - deletes the selected stop
-
Add button - adds a new stop AFTER the selected stop
-
-
Stop [#] B - displays detailed stop information, including whether it is pickup or delivery, the number of pieces, weight, arrival time, departure time, scheduled time, the cutoffs for early and late delivery, and POD information
-
Attempt/Split - allows user to create a second job or to split job stops across two jobs. See eSheet 23 for more information
-
Reseq button - resequences stops, sorted on stop completion time
-
Piece Tab
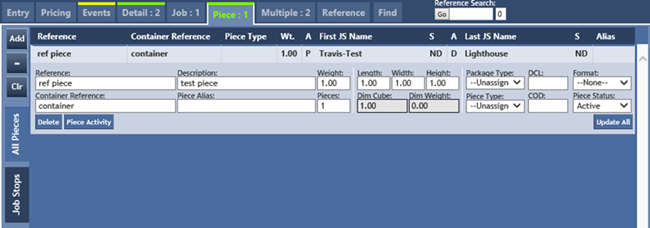
The piece tab lists out all pieces in an order, either in one list (All Pieces tab on left, as in above screenshot) or by job stop (Job Stops tab on left).
The tab title will take the format "Piece : [number of pieces]" and can have different background colors:
-
No color - there are no pieces associated with the order
-
Green (as in above screenshot) - at least one piece associated with the order
-
Red - at least one job stop has been cleared without first completing ALL the pieces for that stop, either via scan or manual entry
Any piece in the list that has not been completed on a cleared stop will show in red. Note that this is triggered at the job stop level; if a driver completes stop 1 of a 10-stop job without completing all pieces in stop 1, the tab will turn red even though the entire job itself is not yet complete.
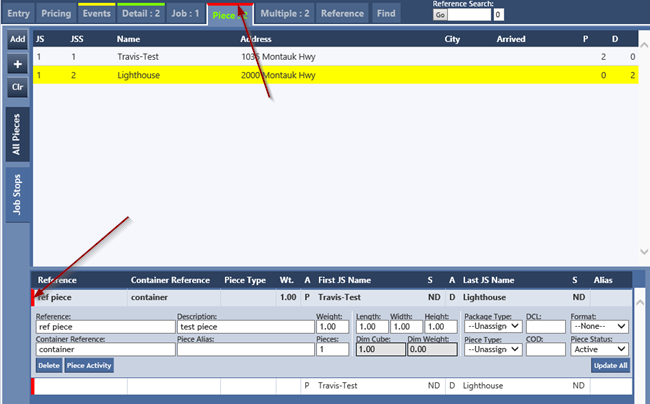
To add a new piece, click the Add button in the top left, fill out the piece information, then the piece activity (the job stops where the piece(s) will be picked up and delivered).
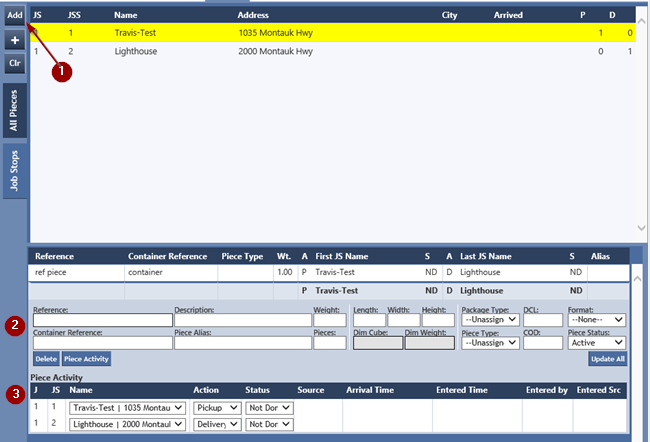
Multiple Tab
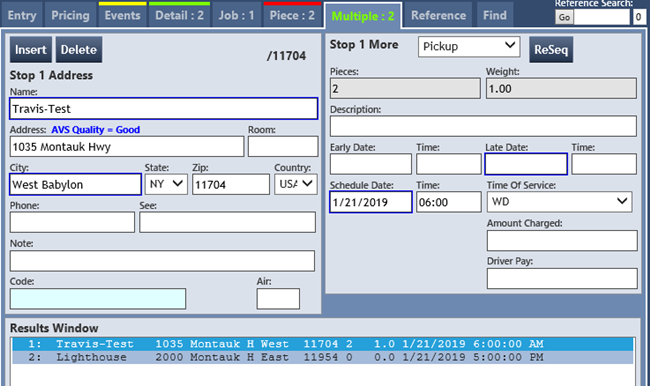
The Multiple tab indicates the number of job stops in an order, as opposed to a job. The distinction becomes important when a single order has more than one job.
The tab title takes the format of "Multiple : [number of order stops]" and if there are more than two, the tab will be highlighted in green.
Order Entry Shortcuts
To help speed up order entry, e-Courier has many shortcuts throughout old and new order entry. Users should practice mouse and keystrokes to see which ones work best for them.
-
Alt-N: New order. Will show a prompt to save existing order
-
Ctrl-Alt-S: Save order
-
Alt-1: Go to Caller frame
-
Alt-2: Go to Pickup frame
-
Alt-3: Go to Destination frame
-
Alt-4: Go to Other frame
-
Alt-5: Go to Other frame > Notes field
-
Ctrl-Alt-R: Repeat order
-
Ctrl-Alt-Z: Roundtrip order
-
Ctrl-Alt-L: Open the last order saved
-
Alt-B: Print Bill of Lading
-
Ctrl-Q: Price quote window
-
Ctrl-F: Flips pickup and delivery information
-
Ctrl-C: If the cursor is in the Pickup Name field, copy the customer pickup information to Pickup frame. If the cursor is in the Destination Name field, copy the customer pickup information to Destination frame
-
Right-click invoice number (find desired order, go to Detail tab > Info frame > Invoice No field): Pulls up the invoice to print